This is a free series of articles, with the aim of teaching/helping ladies put together life management planners. Putting together one of these planners is low cost. In fact, you may have quite a few things you need for this planner, already. This planner will include a full Home Management Binder, as well as planning calendars for your appointments and day to day stuff, and whatever else you need. This is therefore a Life Management Planner, since it will be personally designed by you, for you, to help you manage your life.
This series of articles will provide ideas, suggestions, and guidance for creating the perfect planner. Let's get started.

Like I said above, it's possible that you may already have a lot of the things you'll need, to get started. However, there is one thing that many reading this don't have, and it doesn't cost much money, and it is literally the physical backbone to this Life Management Planner, and that is planner discs.
You see, this planner will be a discbound planner. This means it can be used just like a spiral bound planner, in which you can completely fold it over. A discbound planner can also be used like a binder planner, because you can remove and add all pages, including the covers. There are several companies that sell discs for discbound planners and notebooks. You can do a quick search online, and find places to order online, or you can go to a Staples for the discs. Some Wal-Marts carry discs, as well. Below is a picture of some plastic, black, 2 inch diameter discs from Levenger, and some gold, aluminum, 1.5 inch discs from Staples Arc:

My planner currently has the gold 1.5 inch discs. I personally prefer aluminum discs over plastic. Pages turn smoother on the aluminum ones, but they are more expensive. Through this series, you'll see pictures of a few different planners I put together, one with the black discs, for the sake of pictures and further instruction in this series. This is why in some of the future pictures, you'll sometimes see the gold discs, and sometimes the black ones, etc.
It Doesn't Have to be Discbound
In order to make a Life Management Planner, you can still follow along in this series, and not make your planner discbound. I suggest discbound, because you get the positives of both a spiral bound notebook, and also of a binder. However, I understand that some people just don't like discbound. Or, you may be like me: Sometimes I'm in my discbound, but at other times, I prefer to be in a nice, leather binder. That's okay! :-) You can get a good binder from eBay, the thrift store, Amazon, or where ever you want, if you prefer to make your Life Management Planner in a binder, instead of with discs. Here is a great starter binder, with inserts:
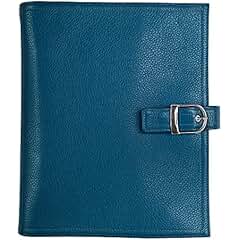
Faux Leather Daytimer Malibu Planner
If you are new to planning, and/or you don't have much of a budget for planning, you may want to start with discs, as this can be the cheaper option. Sometimes a set of discs can be gotten for just a few bucks, and often easily under five dollars. From there, you can do the rest, with stuff you have laying around the house, if you'd like.
Regardless if you will join me in this series with a discbound system, or a binder, I hope you find this Planner University series helpful, inspirational, and fun.
Your Planner's Front and Back Covers
Leather, faux leather, and poly covers can be purchased for these discs at Staples, and some Wal-Marts, or at various places online. However, I suggest you make your own covers. If you have a laminator, it will come in handy for this. If not, you can make your covers, then take them to a Staples, and pay them a small fee to laminate the front and back covers for you.
Making covers is very simple. First determine the size of planner you want. The main planners displayed in this series, are the ones that take half sheets of U.S. paper. These take 8 discs. However, you can also do full size, which takes regular sized paper, or go even smaller than half sheet. Many people like their planners bigger than a half sheet, but smaller than a full sheet. In this case, the Classic sized Happy Planner (takes 9 discs) may be a good idea. You can make your own Happy Planner covers, or purchase some. Below is a picture of a Classic sized Happy Planner, with snap on Happy Planner covers, and 1.5 inch Staples aluminum, gold discs:

If you would like to get a Happy Planner, you can often get them from Staples, and many craft stores, such as Hobby Lobby, Michael's, and Joann's. You can also order them online. You can get really good deals on them at Amazon.
Meanwhile, we'll move on to making homemade covers. The following instructions are for junior sized discbound planners, which is a half sized sheet of paper, but you can do this for any size discbound planner
Supplies You'll Need:
- Some official filler paper or dividers for a junior size discbound planner to use as a template, to make sure you make the right size, and get the punched holes in the right places. You can get filler paper (which you will be using later in your planner anyways) at Staples, and some Wal-Marts, or online at various places that you can find with a Google search.
- Some pretty paper or picture you make/print, or some scrapbook paper to make your covers out of. I like to use MAMBI (Me and My Big Ideas) card stock scrap book paper. I've seen some ladies skip laminating all together, and just make their covers out of some thick and pretty file folders they got from dollar stores, or from Target for a few bucks.
- Scissors
- A laminator, or get the covers laminated at Staples, (or use a thick file folder, or similar, if you don't want to laminate).
- Optional corner rounder (suggested)
- A discbound punch, or a sturdy regular hole punch - either one will work. I have a small Arc punch, and a Happy Planner punch that I use, but I also have a Crop-a-Dile regular one-hole punch that I like to use, as well. You don't have to go out and buy a discbound punch if you don't want to. A regular hole punch for binders will work, as well.
Don't get overwhelmed, because making the covers is actually easy:
1) Use the paper that you have chosen, and design how you want your covers to look. I just cut out my covers from some scrapbook paper, and kept it nice and simple.
2) Cut your papers for the front and back covers to fit your half-page sized planner. Use some discbound filler paper, or divider, or similar, to make sure you make your covers the right size. They should be about a quarter inch taller on the top, and on the bottom than the filler paper, and about a half inch to an inch wider than the filler paper, to allow for divider tabs and one or two pens to be added later, etc.
3) Use an optional (but recommended) corner rounder, and round all four corners, or carefully use scissors to round the corners.
4) Laminate your covers, and then trim off the excess laminate, and round the corners again.
5) Use a discbound punch to punch the covers, or a sturdy one hole binder punch. If using a binder punch, use some discbound filler paper or such as a guide, to mark your covers, where the holes should go. Then, punch the holes. After that, use scissors to snip little channels from the edge to the hole, so that the covers can slip onto the discs, and you are done:

Put the discs onto the covers:


Congratulations. The hardest part of making the planner is over, and making the covers wasn't even that hard, was it? I have dozens of covers for my planner, because I enjoy having the option of changing the covers whenever I want, and the covers do tend to get changed often.
NOTE: To simplify things, you could spend a little more money, and just purchase an Arc notebook from a Staples store. This Arc notebook will come with covers, discs, and some filler paper. The discs will probably be really small, so if you go this route, buy some bigger discs, as well. If you are willing to spend the money, I seriously recommend the gold or silver Arc aluminum discs, 1.5 inch diameter.
In the next article in this Planner University series, we will begin to fill the planner, between the covers. This Planner University series is meant to be quite in depth, and is intended to not only teach you how to put together what I hope to be the most amazing planner of your life, but also to help and motivate you in being a good keeper of your home, and a good manager of your life. Therefore, homemaking skills will be often touched upon, especially in putting together the home management sections of your Life Management Binder.
I intend for an article in this series to go up each day, five (week)days a week, until the whole Planner University series is up. This is an ambitious goal, but one I am trying for. I hope this will really bless and help many of my sisters in Christ, as this is my intent.

